This one is no stretch of the imagination. More a story of stretching the dollars and using what I owned. Legacy sells a very nice horizontal vise kit that comes with cam clamps, a ruler, assorted mounting brackets and the hardware to accomplish the same task. I built my version from scrap parts and a lucky find of cam clamps at a local wood store.
A long time ago I had tossed some questions out regarding the suitability of Legacy's version and the availability of cam clamps. It turned out few members didn't like the brackets and the small bolts used for installation. I think it was Zeke that recommended removing the mounting brackets and use 1/4-20 bolts drilled into Legacy's vise kit for a better grip. It would prevent any twisting and misalignment that the brackets could cause. I believe Mike pointed me towards Grizzly for the cam clamps that could be used in standard T-Track.
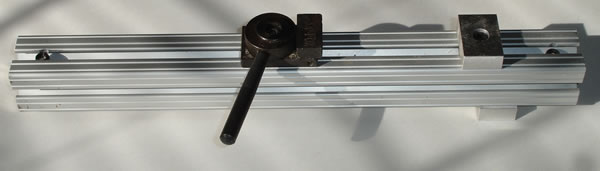
I found the cam clamps at a local wood store the other day that prompted this build. I had a scrap length of 80/20 extruded aluminum (15 series) sitting around gathering dust. I had two rails cut to 14-3/4" long and I had four aluminum blocks made at a machine shop by a good friend. Thanks goes out to MK again.
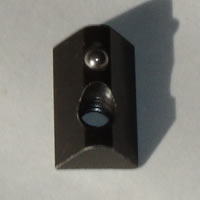
The aluminum blocks serve two purposes. The one on the bottom indexes the rail installation location. This is a little something that I brought to the party. The other block on top serves as a stop for the wood. I feel I can get a quicker setup time if some form of stops are in place on the vises. They are held in the 80/20 track using 1/4-20 - 1/2" socket head cap screws using 80/20 quick release hardware. The hardware can be slipped in and out of the track without disassembly. The screws are countersunk so they will not get in the way. The four blocks are simply 1-1/2" x 1/2" x 1" aluminum.
The cam clamps are made by ShopFox and are available from Grizzly.com and other vendors. They bolt to the 80/20 by using the same screws that came with the clamp, and the 80/20 quick release mounts.
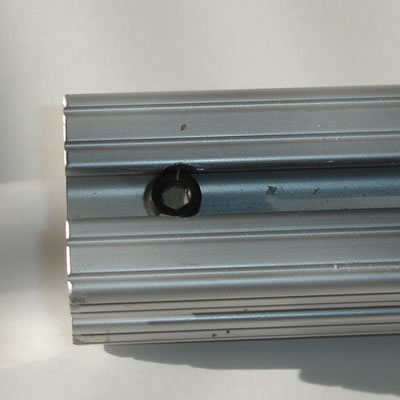
The aluminum rails simply bolt to the top or bottom of the bed using two 1/4-20 - 1-1/2" socket head cap screws. I did clearance those screws about .050" so they did not bottom out while in the Legacy aluminum rails. I used 1/4-20" T-Nuts available for t-track to mount the rails. I know these work well for me in the past and I had a pile of them sitting around. I drilled a 1/4" hole for the mounting screws on each end of the 80/20 rails and then used a 3/8" drill bit for clearance for the screw head. A very simple mount for a very simple task!

To install, I just slide the two vises down my rails, press the lower stops against the back rail, and tighten down the screws. The stops on top will be at the same spot as I last used. The wood can now be clamped for milling, and no more carpet tape.
One thing that I did not show is that I added some foam padding to the jaws of the clamps and to the blocks that will touch any wood. It will prevent any marks on the wood. These clamps can easily crush softwood. They grip in a inward and downward motion that should prevent any material from lifting out of the clamps. I have experienced this problem in previous attempts of creating a clamping system.
That's all for now. Time will tell how much I will kick myself for not making this earlier. I do have to say that it works very well with my new TK Bed Height Adjustment Tool!.
Disclaimer: I am not associated with Legacy Woodworking or Phantom Engineering.
If you have any question or comments, please feel free to email me. Tim
Web Page created 5-26-09 All right reserved.